Google

Sabtu, 08 Desember 2007

Alternatives to Graphics Card Overclocking

Flashing and Unlocking are two popular ways to gain performance out of a video card, without technically overclocking.

Flashing refers to using the BIOS of another card, based on the same core and design specs, to "override" the original BIOS, thus effectively making it a higher model card; however, 'flashing' can be difficult, and sometimes a bad flash can be irreversible. Sometimes stand-alone software to modify the BIOS files can be found, i.e. NiBiTor, (GeForce 6/7 series are well regarded in this aspect). It is not necessary to acquire a BIOS file from a better model video card (although it should be said that the card which BIOS is to be used should be compatible, i.e. the same model base, design and/or manufacture process, revisions etc.). For example, video cards with 3D accelerators (the vast majority of today's market) have two voltage and speed settings - one for 2D and one for 3D - but were designed to operate with three voltage stages, the third being somewhere in the middle of the aforementioned two, serving as a fallback when the card overheats or as a middle-stage when going from 2D to 3D operation mode. Therefore, it could be wise to set this middle-stage prior to "serious" overclocking, specifically because of this fallback ability - the card can drop down to this speed, reducing by a few (or sometimes a few dozen, depending on the setting) percent of its efficiency and cool down, without dropping out of 3D mode (and afterwards return to the desired full-speed clock and voltage settings).

Some cards also have certain abilities not directly connected with overclocking. For example, NVIDIA's GeForce 6600GT (AGP flavor) features a temperature monitor (used internally by the card), which is invisible to the user in the 'vanilla' version of the card's BIOS. Modifying the BIOS (taking it out, reprogramming the values and flashing it back in) can allow a 'Temperature' tab to become visible in the card driver's advanced menu.

Unlocking refers to enabling extra pipelines and/or pixel shaders. The 6800LE, the 6800GS and 6800 (AGP models only) and Radeon X800 Pro VIVO were some of the first cards to benefit from unlocking. While these models have either 8 or 12 pipes enabled, they share the same 16x6 GPU core as a 6800GT or Ultra, but may not have passed inspection when all their pipelines and shaders were unlocked. In more recent generations, both ATI and Nvidia have laser cut pipelines to prevent this practice.[citation needed].

Graphics cards in the same series all share a processor based on the same architecture. For example, all 7 series cards have the 7 series GPU architecture. The differences between cards are the number of transistors in the processor and the speed at which it is clocked. A higher number in the series will have a higher transistor count, for example an 8800 will have more transistors than an 8600. A processor with a higher clock speed is one that has been thoroughly tested at that speed, with the output being checked by ATI or NVIDIA to ensure that there are no silent errors. These are small errors which would go undetected without examining the output for them. Lower models of the processor have not been certified at higher speeds, but can be run at a higher speed than specified.

It is important to remember that while pipeline unlocking sounds very promising, there is absolutely no way of determining if these 'unlocked' pipelines will operate without errors, or at all (this information is solely at the manufacturer's discretion). In a worst-case scenario, the card may not start up ever again, resulting in a 'dead' piece of equipment. It is possible to revert to the card's previous settings, but it involves manual BIOS flashing using special tools and an identical but original BIOS chip.

Overclocking graphics cards

Graphics cards can also be overclocked, with utilities such as NVIDIA's Coolbits, or the PEG Link Mode on ASUS motherboards. Overclocking a video card usually shows a much better result in gaming than overclocking a processor or memory. Just like overclocking a processor, sufficient cooling is a must. Many graphics cards overheat and burn out when overclocked too much.

Sometimes, it is possible to see that a graphics card is pushed beyond its limits before any permanent damage is done by observing on-screen distortions known as artifacts. Two such discriminated "warning bells" are widely understood: green-flashing, random triangles appearing on the screen usually correspond to overheating problems on the GPU (Graphics Processing Unit) itself, while white, flashing dots appearing randomly (usually in groups) on the screen often mean that the card's RAM (memory) is overheating. It is common to run into one of those problems when overclocking graphics cards. Showing both symptoms at the same time usually means that the card is severely pushed beyond its heat/speed/voltage limits. If seen at normal speed, voltage and temperature, they may indicate faults with the card itself.

Some overclockers use a hardware voltage modification where a potentiometer is applied to the video card to manually adjust the voltage. This results in much greater flexibility, as overclocking software for graphics cards is rarely able to freely adjust the voltage. Voltage mods are very risky and may result in a dead video card, especially if the voltage modification ("voltmod") is applied by an inexperienced individual. It is also worth mentioning that adding physical elements to the video card immediately voids the warranty (even if the component has been designed and manufactured with overclocking in mind, and has the appropriate section in its warranty).

Measuring effects of overclocking

Benchmarks are used to evaluate performance. The benchmarks can themselves become a kind of 'sport', in which users compete for the highest scores. As discussed above, stability and functional correctness may be compromised when overclocking, and meaningful benchmark results depend on correct execution of the benchmark. Because of this, benchmark scores may be qualified with stability and correctness notes (e.g. an overclocker may report a score, noting that the benchmark only runs to completion 1 in 5 times, or that signs of incorrect execution such as display corruption are visible while running the benchmark).

Given only benchmark scores it may be difficult to judge the difference overclocking makes to the computing experience. For example, some benchmarks test only one aspect of the system, such as memory bandwidth, without taking into consideration how higher speeds in this aspect will improve the system performance as a whole. Apart from demanding applications such as video encoding, high-demand databases and scientific computing, memory bandwidth is typically not a bottleneck, so a great increase in memory bandwidth may be unnoticeable to a user depending on the applications they prefer to use. Other benchmarks, such as 3DMark attempt to replicate game conditions, but because some tests involve non-deterministic physics, such as ragdoll motion, the scene is slightly different each time and small differences in test score are overcome by the noise floor.[citation needed]

Factors allowing overclocking

Overclockability arises in part due to the economics of the manufacturing processes of CPUs. In most cases, CPUs with different rated clock speeds are manufactured via exactly the same process. The clock speed that the CPU is rated for is at or below the speed at which the CPU has passed the manufacturer's functionality tests when operating in worst-case conditions (for example, the highest allowed temperature and lowest allowed supply voltage). Manufacturers must also leave additional margin for reasons discussed below. Sometimes manufacturers have an excess of similarly high-performing parts and cannot sell them all at the flagship price, so some are marked as medium-speed chips to be sold for medium prices. The performance of a given CPU stepping usually does not vary as widely as the marketing clock levels[citation needed].

When a manufacturer rates a chip for a certain speed, it must ensure that the chip functions properly at that speed over the entire range of allowed operating conditions. When overclocking a system, the operating conditions are usually tightly controlled, making the manufacturer's margin available as free headroom. Other system components are generally designed with margins for similar reasons; overclocked systems absorb this designed headroom and operate at lower tolerances. Pentium architect Bob Colwell calls overclocking an "uncontrolled experiment in better-than-worst-case system operation".[8]

Some of what appears to be spare margin is actually required for proper operation of a processor throughout its lifetime. As semiconductor devices age, various effects such as hot carrier injection, negative bias thermal instability and electromigration reduce circuit performance. When overclocking a new chip it is possible to take advantage of this margin, but as the chip ages this can result in situations where a processor that has operated correctly at overclocked speeds for years spontaneously fails to operate at those same speeds later. If the overclocker is not actively testing for system stability when these effects become significant, errors encountered are likely to be blamed on sources other than the overclocking.

Stability and functional correctness

As an overclocked component operates outside of the manufacturer's recommended operating conditions, it may function incorrectly, leading to system instability. An unstable overclocked system, while it may work fast, can be frustrating to use. Another risk is silent data corruption—errors that are initially undetected. In general, overclockers claim that testing can ensure that an overclocked system is stable and functioning correctly. Although software tools are available for testing hardware stability, it is generally impossible for anyone (even the processor manufacturer) to thoroughly test the functionality of a processor. A particular "stress test" can verify only the functionality of the specific instruction sequence used in combination with the data and may not detect faults in those operations. For example, an arithmetic operation may produce the correct result but incorrect flags; if the flags are not checked, the error will go undetected. Achieving good fault coverage requires immense engineering effort, and despite all the resources dedicated to validation by manufacturers, mistakes can still be made. To further complicate matters, in process technologies such as silicon on insulator, devices display hysteresis—a circuit's performance is affected by the events of the past, so without carefully targeted tests it is possible for a particular sequence of state changes to work at overclocked speeds in one situation but not another even if the voltage and temperature are the same. Often, an overclocked system which passes stress tests experiences instabilities in other programs.[7]

In overclocking circles, "stress tests" or "torture tests" are used to check for correct operation of a component. These workloads are selected as they put a very high load on the component of interest (e.g. a graphically-intensive application for testing video cards, or a processor-intensive application for testing processors). Popular stress tests include Prime95, Super PI, SiSoftware Sandra, BOINC, Intel Thermal Analysis Tool and Memtest86. The hope is that any functional-correctness issues with the overclocked component will show up during these tests, and if no errors are detected during the test, the component is then deemed "stable". Since fault coverage is important in stability testing, the tests are often run for long periods of time, hours or even days.

Manufacturer and vendor overclocking

Commercial system builders or component resellers sometimes overclock to sell items at higher profit margins. The retailer makes more money by buying lower-value components, overclocking them, and selling them at prices appropriate to a non-overclocked system at the new speed. In some cases an overclocked component is functionally identical to a non-overclocked one of the new speed, however, if an overclocked system is marketed as a non-overclocked system (it is generally assumed that unless a system is specifically marked as overclocked, it is not overclocked), it is considered fraudulent.

Overclocking is sometimes offered as a legitimate service or feature for consumers, in which a manufacturer or retailer tests the overclocking capability of processors, memory, video cards, and other hardware products. Several video card manufactures now offer factory overclocked versions of their graphics accelerators, complete with a warranty, which offers an attractive solution for enthusiasts seeking an improved performance without sacrificing common warranty protections. Such factory overclocked products often demand a marginal price premium over reference-clocked components, but the performance increase and cost savings can sometimes outweigh the price increases associated with similar, albeit higher-performance offerings from the next product tier.

Naturally, manufacturers would prefer enthusiasts pay additional money for profitable high-end products, in addition to concerns of less reliable components and shortened product life spans impacting brand image. It is speculated that such concerns are often motivating factors for manufacturers to implement overclocking prevention mechanisms such as CPU locking. These measures are sometimes marketed as a consumer protection benefit, which typically generates a negative reception from overclocking enthusiasts.

Rabu, 14 November 2007

Beginners Guides: Overclocking the CPU, Motherboard & Memory

The term overclocking is thrown around a lot, for better or worse. If you're one of the many who has never overclocked, this guide will explain what it is and how to do it to the computers' processor, motherboard and memory.
The prospect of overclocking a computer system can be intimidating for a computer newcomer, to say the least. The idea is simple enough; make the computer's processor run faster than its stock speed to gain more performance without paying for it. The execution of this idea though, can be anything but simple.

Successful overclocking is as often a matter of 'what you know' as 'what you have'. Understanding the maze of hardware dependencies and tweaks that can make the difference between a successful overclock and total failure is a demanding practice.

In this Beginners Guide, PCSTATS will explore the process of overclocking processors, motherboards and memory to achieve a faster yet still stable computer. The article will guide readers step-by-step through understanding overclocking concepts, how to discover their hardware's overclocking options and the actual process of overclocking. If you consider yourself an expert already, read on - there are a few tips and tricks packed into this guide that you may not know... or have a look at our recent experiment with underclocking. For insight into videocard overclocking, please see our companion guide on that subject right here.

What Does Overclocking Do?

Overclocking a computer's processor or memory causes it to go faster than its factory rated speed. A processor rated at 2.4GHz might be overclocked to 2.5GHz or 2.6GHz, while memory rated at 200MHz might be pushed to 220MHz or higher. The extra speed results in more work being done by the processor and/or memory in a given time period, increasing the overall computing performance of the PC.

Can Overclocking Damage Computer Hardware?

Yes, but it's typically unlikely. Generally speaking, when computer hardware is pushed beyond its limits, it will lock up, crash or show other obvious errors long before it gets to the point where the processor or memory might be permanently damaged. The exception to this is if extreme voltages are used when attempting to overclock, but since most motherboards do not support extremely high voltages, and neither does this guide, it's not likely to be an issue.

For older processors, heat is also a factor worth keeping a close eye on. Modern processors have thermal sensors which will slow down or shut off the PC, but older CPUs do not necessarily feature these safety devices. The best know example of this is the AMD AthlonXP (socket A/462), which was famous for burning itself up in less than 5 seconds if the heatsink was not installed properly (or at all).

The Purpose of Overclocking

The most obvious reason to overclock a computer system is to squeeze some additional performance out of it at little or no cost. Overclocking the processor and system memory can significantly boost game performance, benchmark scores and even simple desktop tasks. Since almost every modern processor and memory module is overclockable to at least a slight degree, there are few reasons not to attempt it.

Jumat, 28 September 2007

How to Install a SATA Hard Drive

The main reason for adding or replacing a hard drive is to increase storage capacity and then to increase system performance. SATA drives are faster than the traditional standard drives and with the low prices of storage more people are looking for space to store all of those music or photo files they have been colleting. Or of course looking for a additional drive to use mainly for backup purposes.

Power down your PC and switch it off at the wall. Remove the screws holding the sides of the case on and carefully slide off both panels.

Wearing an anti-static wristband is preferable whenever working with sensitive electrical equipment. Keeping one hand on a metal part of the case will have the same effect, though you may need both hands when installing certain items of hardware.

If you are replacing a current drive, you will need remove the power and data cables, then unscrew the drive from the cage. Carefully slide the drive out backwards - you may need to remove some additional cables and/or expansion cards if space it tight.


Remove your new drive from its anti-static packaging and slide the drive into the cage. Secure it tightly with four screws, with two in each side of the cage.

Locate the drive away from any other drives to allow air to flow as freely as possible.


Whilst not essential, doing this will help keep temperatures down within your case and extend the life of your drive.

Next, you will need to plug in the SATA data and power cables. The data cable needs to be plugged into your motherboard on the first available SATA channel. If you have replaced your primary drive, this would be SATA1, though if it is an additional drive, may be SATA2, for example.


SATA drives have a different power connector to IDE drives, and you will need an additional cable to convert a standard molex power connector to a SATA one. Newer power supply units may have SATA connectors, though the majority don't so you will need a cable similar to the one shown below.

How to Install a PCI-E/AGP Graphics Card

The Graphics Card or Video Card as it is also known allows your Computer to display thousands of colours and images to your display. Some computers have a graphics card built-in to the motherboard this are usually low spec cards and normally use memory from your system (RAM) to run.

The most common reason for a graphics card upgrade is to allow users to run games faster and more smoothly or to add TV/DVI out to your system.

Steps to Install a Graphics Card:
Power down your PC and switch it off at the wall. Remove the screws holding the sides of the case on and carefully slide off both panels.
Wearing an anti-static wristband is preferable whenever working with sensitive electrical equipment. Keeping one hand on a metal part of the case will have the same effect, though you may need both hands when installing certain items of hardware.

If you are replacing an old card, you will need to remove it by loosening the screw holding the backing plate to the case and carefully sliding the card out of the slot. You may also have to undo a clip depending on the design of your motherboard.

Alternatively, you may need to remove the backing plate in front of the AGP or PCI-E slot. Simply remove the screw and slide the backing plate out of the case. For some graphics cards, you may need to remove two adjacent backing plates as the size of the heatsink and fan dictates that the card is double the height of an ordinary expansion card.

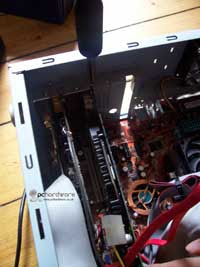
Next, remove the new card from its anti-static bag and line the card up with the slot. AGP slots tend to be brown and set back from the PCI slots, whereas PCI-E slots are longer and tend to be black. Push down on the card until it sits firmly within its slot. Push the plastic catch up on the slot to further secure the card.

Secure the backing plate by screwing it firmly to the case. Check that the card cannot move and that the fan on the GPU is clear of obstructions such as floating cables.


Finally, check whether or not your new card requires an additional power source. Some of the more powerful PCI-E cards have a square four-pin power connector slot, so you may need to purchase an additional cable to convert a molex connector if one hasn't been bundled with your graphics card.


Finally, replace the sides of your case and reconnect the cable to your machine.

Boot up your PC and make sure that the POST and Windows splash screens are displayed. This indicates that your card is installed and functioning correctly.

If the display does not show first power down and recheck the card connector as this may of become knocked if yhe system case had been moved.

Once Windows has started, you may be prompted to install drivers for your new card. You may be best cancelling this dialogue and then running the installation program on the driver CD that came with your card. This will install the drivers as well as giving you the option to install other bundled software such as tweaking utilities or DVD playing software.

Once you have installed the new drivers and rebooted, you should be able to reset your desktop resolution by going to the desktop, right clicking, selecting properties and then heading to the Settings tab. You should also visit the manufacturer's website and check for newer drivers, as these will offer optimum performance and iron out glitches with previous driver versions.

How to Install or add Computer Memory (RAM) to your computer

Installing more memory is the cheapest upgrade for your computer. By increasing the amount of RAM you have in your system the greater the temporary storage for it to work with when running programs and applications.

Especially when using software to edit large files such as digital photos and videos alongside simple tasks such as just loading your computer with more RAM Windows will load faster and allow you to open and close programs quicker so that you can truly multitask.

Offtek provide a wide range of products including server and router memory alongside standard memory and removable flash media for all UK based customers.

Power down your PC and switch it off at the wall. Remove the screws holding the sides of the case on and carefully slide off both panels.


Wearing an anti-static wristband is preferable whenever working with sensitive electrical equipment. Keeping one hand on a metal part of the case will have the same effect, though you may need both hands when installing certain items of hardware.

First, locate your RAM slots, which are typically located near to the CPU. You may need to unplug a few power cables to give yourself enough room to work with, though make sure you remember what you have unplugged.

Remove the RAM from its anti static bag and hold it by the edges as shown in the adjacent image. This will minimise contact with the working parts hence reduce the risk of static damaging the RAM.

Line the RAM up with one of the slots on your motherboard. Make sure you have the RAM the correct way round, otherwise it will not fit into the slot correctly. You should also note whether or not the RAM is dual channel, in which case you will need two identical sticks of RAM in adjacent slots to get the full effect. Refer to your motherboard manual if you are unsure of this.


Begin to push down on the RAM module. In some cases, fairly significant pressure is required, so push down gently at first and increase the pressure until the RAM slots into the motherboard. Ensure that the white tab at either side is locked in the vertical position which will keep the RAM module secure. Finally, replace any cables you removed and put the sides of the case back on. Boot up your machine and check that your new memory is accounted for by the RAM check at POST.

Opteron/ Athlon64

AMD’s 8th generation CPU was released in 2003. It is based on a completely new core called Hammer.

A new series of 64-bits processors is called Athlon 64, Athlon 64 FX and Opteron. These CPU’s has a new design in two areas:

  • The memory controller is integrated in the CPU. Traditionally this function has been housed in the north bridge, but now it is placed inside the processor.
  • AMD introduces a completely new 64-bit set of instructions.

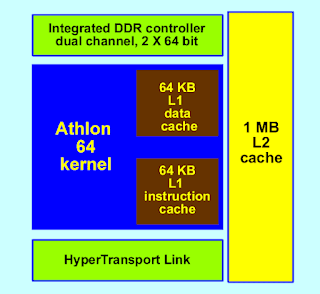
    Moving the memory controller into the CPU is a great innovation. It gives a much more efficient communication between CPU and RAM (which has to be ECC DDR SDRAM – 72 bit modules with error correction).)

    Every time the CPU has to fetch data from normal RAM, it has to first send a request to the chipset’s controller. It has to then wait for the controller to fetch the desired data – and that can take a long time, resulting in wasted clock ticks and reduced CPU efficiency. By building the memory controller directly into the CPU, this waste is reduced. The CPU is given much more direct access to RAM. And that should reduce latency time and increase the effective bandwidth.

    The Athlon 64 processors are designed for 64 bits applications. This should be more powerful than the existing 32 bit software. We will probably see plenty of new 64 bit software in the future, since Intel is releasing 64 bit processors compatible with the Athlon 64 series.


  • Figur 114. In the Athlon 64 the memory controller is located inside the processor. Hence, the RAM modules are interfacing directly with the CPU.

    Overall the Athlon 64 is an updated Athlon-processor with integrated north bridge and 64 bits instructions. Other news are:


  • Support for SSE2 instructions and 16 registers for this.
  • Dual channel interface to DDR RAM giving a 128 bit memory bus, although the discount version Athlon 64 keeps the 64 bit bus.
  • Communikationen to and from the south bridge via a new HyperTransport bus, operating with high-speed serial transfer.
  • New sockets of 754 and 940 pins.
  • Athlon XP versus Pentium 4

    The Athlon processor came in various versions. It started as a Slot A module (see Fig. 107 on page 42). It was then moved to Socket A, when the L2 cache was integrated.

    In 2001, a new Athlon XP version was released, which included improvements like a new Hardware Auto Data Prefetch Unit and a bigger Translation Look-aside Buffer. The Athlon XP was much less advanced than the Pentium 4 but quite superior at clock frequencies less than 2000 MHz. A 1667 MHz version of AthlonXP was sold as 2000+. This indicates, that the processor as a minimum performs like a 2000 MHz Pentium 4.

    Later we saw Athlons in other versions. The latest was based on a new kernel called ”Barton”. It was introduced in 2003 with a L2-cachen of 512 KB. AMD tried to sell the 2166 MHz version under the brand 3000+. It did not work. A Pentium 4 running at 3000 MHz had no problems outperforming the Athlon.

    Athlon

    The last processor I will discuss is the popular Athlon and Athlon 64 processor series (or K7 and K8).

    It was a big effort on the part of the relatively small manufacturer, AMD, when they challenged the giant Intel with a complete new processor design.

    The first models were released in 1999, at a time when Intel was the completely dominant supplier of PC processors. AMD set their sights high – they wanted to make a better processor than the Pentium II, and yet cheaper at the same time. There was a fierce battle between AMD and Intel between 1999 and 2001, and one would have to say that AMD was the victor. They certainly took a large part of the market from Intel.

    The original 1999 Athlon was very powerfully equipped with pipelines and computing units:

  • Three instruction decoders which translated X86 program CISC instructions into the more efficient RISC instructions (ROP’s) – 9 of which could be executed at the same time.
  • Could handle up to 72 instructions (ROP out of order) at the same time (the Pentium III could manage 40, the K6-2 only 24).
  • Very strong FPU performance, with three simultaneous instructions.

    All in all, the Athlon was in a class above the Pentium II and III in those years. Since Athlon processors were sold at competitive prices, they were incredibly successful. They also launched the Duron line of processors, as the counterpart to Intel’s Celeron, and were just as successful with it.

  • Evolution of the Pentium 4

    As was mentioned earlier, the older P6 architecture was released back in 1995. Up to 2002, the Pentium III processors were sold alongside the Pentium 4. That means, in practise, that Intel’s sixth CPU generation has lasted 7 years.

    Similarly, we may expect this seventh generation Pentium 4 to dominate the market for a number of years. The processors may still be called Pentium 4, but it comes in al lot varietes.

    A mayor modification comes with the version using 0.65 micron process technology. It will open for higher clock frequencies, but there will also be a number of other improvements.

    Hyper-Threading Technology is a very exciting structure, which can be briefly outlined as follows: In order to exploit the powerful pipeline in the Pentium 4, it has been permitted to process two threads at the same time. Threads are series of software instructions. Normal processors can only process one thread at a time.

    In servers, where several processors are installed in the same motherboard (MP systems), several threads can be processed at the same time. However, this requires that the programs be set up to exploit the MP system, as discussed on page 31.

    The new thing is that a single Pentium 4 logically can function as if there physically were two processors in the pc. The processor core (with its long pipelines) is simply so powerful that it can, in many cases, act as two processors. It’s a bit like one person being able to carry on two independent telephone conversations at the same time.


    Figur 110. The Pentium 4 is ready for MP functions.

    Hyper-Threading works very well in Intel’s Prescott-versions of Pentium 4. You gain performance when you operate more than one task at the time. If you have two programs working simultaneously, both putting heavy pressure on the CPU, you will benefit from this technology. But you need a MP-compatible operating system (like Windows XP Professional) to benefit from it.

    The next step in this evolution is the production of dual-core processors. AMD produces Opteron chips which hold two processors in one chip. Intel is working on dual core versions of the Pentium 4 (with the codename ”Smithfield”). These chips will find use in servers and high performance pc’s. A dual core Pentium 4 with Hyper-Threading enabled will in fact operate as a virtual quad-core processor.


    Figur 111. A dual core processor with Hyper Threading operates as virtual quad-processor.

    Intel also produces EE-versions of the Pentium 4. EE is for Extreme Edition, and these processors are extremely speedy versions carrying 2 MB of L2 cache.

    In late 2004 Intel changed the socket design of the Pentium 4. The new processors have no ”pins”; they connect directly to the socket using little contacts in the processor surface.


    Figur 112. The LGA 775 socket for Pentium 4.


    The suppliers of system software

    All PCs have instructions in ROM chips on the motherboard. The ROM chips are supplied by specialty software manufacturers, who make BIOS chips. The primary suppliers are:


  • Phoenix
  • AMI ( American Megatrends )
  • Award

    You can read the name of your BIOS chip during start-up. You can also see the chip on the system board. Here is a picture (slightly blurred) of an Award ROM chip:


  • Here is an AMI chip with BIOS and start-up instructions:


    Let us look at the different components inside the ROM chip.

    Data exchange - the motherboard

    The ROM chips contain instructions, which are specific for that particular motherboard. Those programs and instructions will remain in the PC throughout its life; usually they are not altered.

    Primarily the ROM code holds start-up instructions. In fact there are several different programs inside the start-up instructions, but for most users, they are all woven together. You can differentiate between:


  • POST (Power On Self Test)
  • The Setup instructions, which connect with the CMOS instructions
  • BIOS instructions, which connect with the various hardware peripherals
  • The Boot instructions, which call the operating system (DOS, OS/2, or Windows )

    All these instructions are in ROM chips, and they are activated one by one during start-up. Let us look at each part.

  • The von Neumann Model of the PC

    Computers have their roots 300 years back in history. Mathematicians and philosophers like Pascal, Leibnitz, Babbage and Boole made the foundation with their theoretical works. Only in the second half of this century was electronic science sufficiently developed to make practical use of their theories.

    The modern PC has roots that go back to the USA in the 1940s. Among the many scientists, I like to remember John von Neumann (1903-57). He was a mathematician, born in Hungary. We can still use his computer design today. He broke computer hardware down in five primary parts:

  • CPU
  • Input
  • Output
  • Working memory
  • Permanent memory

    Actually, von Neumann was the first to design a computer with a working memory (what we today call RAM). If we apply his model to current PCs, it will look like this:

  • All these subjects will be covered.

    The PC construction

    The PC consists of a central unit (referred to as the computer) and various peripherals. The computer is a box, which contains most of the working electronics. It is connected with cables to the peripherals.

    On these pages, I will show you the computer and its components. Here is a picture of the computer:

    Here is a list of the PC components. Read it and ask yourself what the words mean. Do you recognize all these components? They will be covered in the following pages.

    The PC's success

    The PC came out in 1981. In less than 20 years, it has totally changed our means of communicating. When the PC was introduced by IBM, it was just one of many different micro data processors. However, the PC caught on. In 5-7 years, it conquered the market. From being an IBM compatible PC, it became the standard.

    If we look at early PCs, they are characterized by a number of features. Those were instrumental in creating the PC success.

  • The PC was from the start standardized and had an open architecture.
  • It was well documented and had great possibilities for expansion.
  • It was inexpensive, simple and robust (definitely not advanced).

    The PC started as IBM's baby. It was their design, built over an Intel processor (8088) and fitted to Microsoft's simple operating system MS-DOS.

    Since the design was well documented, other companies entered the market. They could produce functionable copies (clones) of the central system software (BIOS). The central ISA bus was not patented. Slowly, a myriad of companies developed, manufacturing IBM compatible PCs and components for them.

    The Clone was born. A clone is a copy of a machine. A machine, which can do precisely the same as the original (read Big Blue - IBM). Some of the components (for example the hard disk) may be identical to the original. However, the Clone has another name (Compaq, Olivetti, etc.), or it has no name at all. This is the case with "the real clones." Today, we differentiate between:

  • Brand names, PCs from IBM, Compaq, AST, etc. Companies which are so big, so they develop their own hardware components.

  • Clones, which are built from standard components. Anyone can make a clone.

    Since the basic technology is shared by all PCs, I will start with a review of that.

  • Introduction to the PC

    The technical term for a PC is micro data processor . That name is no longer in common use. However, it places the PC in the bottom of the computer hierarchy:

  • Supercomputers and Mainframes are the largest computers - million dollar machines, which can occupy more than one room. An example is IBM model 390.

  • Minicomputers are large powerful machines. They typically serve a network of simple terminals. IBM's AS/400 is an example of a minicomputer.

  • Workstations are powerful user machines. They have the power to handle complex engineering applications. They use the UNIX or sometimes the NT operating system. Workstations can be equipped with powerful RISC processors like Digital Alpha or MIPS.

  • The PCs are the Benjamins in this order: Small inexpensive, mass produced computers. They work on DOS, Windows , or similar operating systems. They are used for standard applications.

    The point of this history is, that Benjamin has grown. He has actually been promoted to captain! Todays PCs are just as powerful as minicomputers and mainframes were not too many years ago. A powerful PC can easily keep up with the expensive workstations. How have we advanced this far?

  •